All things Raspberry Pi and Time Lapse

Posts tagged ‘gphoto2’

Some pictures that it shot before stopping

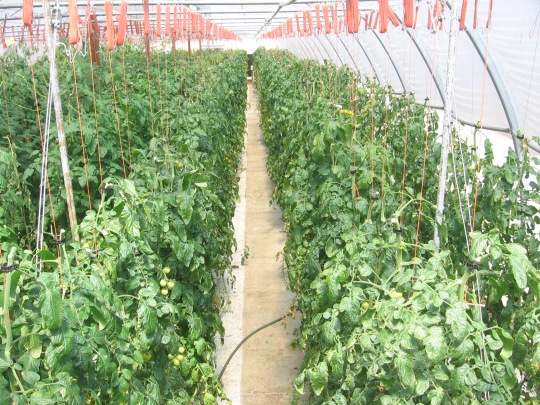
Here is the first image that it took on 8-26 at 12noon.

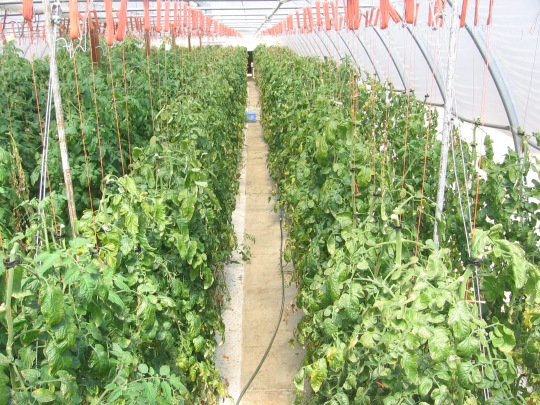
And this image was taken on 9-3 at 12noon.

It is not very clear in this format, but if you download both images and then flip back and forth there is a major change in the plants in the 9 days from the first one to second one. I am hoping to see more of these differences as the plants grow!

Unfortunately it only took pictures for 9 days and that is too short to make into a timelapse…. And when it was taking a picture every 2 minutes it had focusing problems. There is no way to set a manual focus, however I thought I had that accomplished using focuslock in gphoto2. The focus lock seemed to work just fine for the once a day picture but not the other. There was nothing that was moving drastically from each shot so it was weird that it didn’t focus right.

Still planning to setup for the second time this weekend!

Problem Solved!

I now know what the problem with the time lapse setup was. For some reason Canon decided to put every like 100 pictures into a new folders and name the folders 157CANON and 158CANON and so on. So it was leaving these pictures on the camera card and not downloading them onto my card. This causes a problem because the card (in the camera) filled up and then it stopped taking pictures. That makes sense why it wont take a picture when the card is full, but it doesn’t make sense why Canon operates this way. However this is the easy part of the problem. The harder part was getting it to take a picture again. I would reformat the SD card using the cameras reformat option and then try to take a picture from gphoto2. It would give an “unspecified error” and that was not very helpful in figuring out the problem. The solution (which took me forever to figure out) was that the first picture has to be physically taken from the camera. After that first picture is taken by actually pushing the physical button on the camera, then gphoto2 will take pictures just fine.

So the solution is to make sure that I take that first picture and then make sure that the SD card does not fill up. This is possible to achieve from gphoto2 because it is possible to naviagate into the sd card that is in the camera by issueing the command

gphoto2 –shell

and then some* of the regular linux commands work. I say * because very few work and those that do have minor quirks. The main command “cd” works like normal, but there are some issues with tab completion. I wrote this script that uses a here document to actually execute the commands. This was the only way I could figure out how to get it to work. This script is not finalized because I think I will actually want to save the pictures that it is leaving in this folder until I can be certain that it is downloading the same picture onto the Raspberry Pi. (UPDATE) I setup and let it shoot for a day as a test and I confirmed that it is starting a new folder every 100 pictures. And it is NOT saving a copy of it to the Raspberry Pi. It takes the 100th picture and leaves it on the card. And leaves it in the terrible naming format as well.

#!/bin/bash
# jamesmiller
To be updated….

Hopefully going to install the project back in the greenhouse this weekend!!

Update… And its not good…

I went to check on how the time lapse setup was working. And it was not. It worked for not quite a week and then stopped taking pictures for some reason. So I brought it home and have been working to see what was wrong. And so far I cant figure it out. I cannot get the camera to take a picture using gphoto2 anymore. I tried a whole new installation of Arch (I kept the previous one separate) and it still wont take a picture. The other camera that I had bought previously (Canon Powershot SX100) will work just fine though. So that would lead me to believe that the Powershot A510 wont work. However, the camera will still take a picture just fine when it is disconnected from the Raspberry Pi and functioning like a regular camera.

So now I am not sure what to try. It seems like it is a problem with the camera, but the camera will still take a picture so it didnt completely die. Anyone have any suggestions?

Raspberry Pi arrived!

I have been playing around with my Raspberry Pi for about the past 3ish hours! It is an amazing little device! My curiosity for how it will work with my project caused me to jump right into working on those details.

I wrote the disk image to the SD card following the instructions here – I used the dd command on Fedora. Then to fix the partitions I used gparted on Fedora. Good instructions are here.

I do not like Debian/Ubuntu as well as some other distributions because they do not adhere to some of the conventions as well as other distributions do. This is mainly a personal preference, but since I have a choice I can be picky. So I started with the Arch distribution. All was going well until I tried to install gphoto2. It would get part way through installing and then would quit with an unknown error message. I have not used Arch very much so I moved onto the Fedora distribution. This distribution is not recommended and I can see why. About every 20-30 seconds it would dump error message garbage into the terminal. And since Fedora is not a stable distro I decided that for my project a stable distrobution will probably help me not to lose sleep at night worrying about whether something happened and it shut off.

Next I tried Debian 6. For some reason it starts up, then tries to shut itself down the first time. And it hangs on stopping portmap. However after cycling the power it starts up just fine into runlevel 3 – command line mode. However after after installing gphoto2 it would not take a picture. So I tried installing an older version of gphoto2. Still nothing. It would sometimes take a picture, but then after that it would stop responding. So that was not an option.

The next morning I decided to go back to Arch and spend a little more time on that. After figuring out that it is required to select the mirror where the package manager searches for files I edited /etc/pacman.d/mirrorlist and uncommented several mirrors. Then it would install! And it installed gphoto2 just fine and it works perfectly when run as root. If gphoto2 is run as an ordinary user it causes problems. So after some messing around (hey this is what I like doing!) I now have Arch running and gphoto2 working as expected.

gphoto2 camera scripts

I could not wait for my Raspberry Pi to arrive so I went ahead and wrote the scripts using gphoto to take pictures. These were written on a Fedora desktop, but since it is using standard Linux commands it should work from any distribution.

A very good tutorial on cron and at are availble here at IBM.

This first one is pretty standard. It will take a picture at noon once a day… The actual scheduling of the script will take place using the cron daemon.

#!/bin/bash
# jamesmiller
# 6-22-2012
#
# change directories to the correct folder to save the image
cd /home/jamesmiller/gphoto/1day
# actually take the picture using gphoto2
gphoto2 –capture-image-and-download –filename “%Y%m%d%H%M%S_1day.jpg”

Note the last line is supposed to be all on one line. The crontab entry for this first script will look like this… The twelve in the second position means to take the picture at 12:00 (noon) every day of the month, every month, every day of the week. Note that the time in cron uses a 24 hour clock.

0 12 * * * /home/jamesmiller/gphoto/1day

And the second one is very similar to the first. Except it will take a picture once every 5 minutes for an entire day on the first and fifth days of the month. In the final I will only use one of the days a month, but by shooting two days that gives me an error margin (if the power goes out that day) or some other unforeseen accident occurs.

#!/bin/bash
# jamesmiller
# 6-22-2012
#
# change directories to the correct folder to save the image
cd /home/jamesmiller/gphoto/5min
# actually take the picture using gphoto2
gphoto2 –capture-image-and-download –filename “%Y%m%d%H%M%S_5min.jpg”

Note the last line is supposed to be all on one line. This script is very similar to the last script except for the file location where it will store the images. This will keep the different scripts separate. However the crontab entry for this script is very different! The first (*/5) means to take a picture every 5 minutes, the second piece (4-20) means to only take the picture if the time is between 4am and 8pm, and the (1,5) means on the first and fifth of the month to execute. the last two stars mean every month, every day of the week. This script will provide a time-lapse that looks like 12 days – one for each month of the year.

*/5 4-20 1,5 * * /home/jamesmiller/gphoto/5min

The last script is more complicated. It uses cron and it also uses a different scheduling daemon called at.

#!/bin/bash
# jamesmiller
# 6-22-2012
#
# change directories to the correct folder to save the image
cd /home/jamesmiller/gphoto/1443min
# schedule the next runtime of this script
at -f ../camera_1443min now + 1443min
# store the date and time in a file to be read as the time
# when the picture was taken.
echo `date +%Y%m%d%H%M%S` >> ../1443_time
# actually take the picture using gphoto2
gphoto2 –capture-image-and-download –filename “%Y%m%d%H%M%S_1443min.jpg”

Note the last line is supposed to be all on one line. The purpose of this script is to take a picture at like 4:00am the first day, then the next day at 4:03, and the next day at 4:06 and so on. This last script will provide a very interesting time lapse as it will take one year and compress it into time lapse that looks like a day. It will start in the morning and end at night, but all 4 seasons will have passed. I am not totally sure at what time I want this to start, because there is no reason to take pictures in the dark. The cron details I have not finished working on yet, but I will add them here when I finish it.

cron details to follow

Those are my ideas for a year-long time lapse. This will give me three different looks into the scene over the course of a year. If anyone has other/more ideas for when the camera should take a picture do not hesitate to comment below!

Plan B

The Canon Powershot S2 IS will not fit in the enclosure with the cables connected. So after thinking about the requirements for the camera, I decided that CHDK is not a requirement like I originally thought. I can do everything from gphoto2 using scripts. So I ordered a Canon Powershot A510 from Amazon that is much smaller and as near as I can tell will fit in the enclosure. Now just waiting for it to be delivered!

BOM (Bill of Materials)

Here is a list of the materials (that I have though of so far) needed for the year-long time lapse.

First thing is Location. Its all about location, location, location.

1. A RaspberryPi. This is to control the camera and tell it when to take a picture. It would be possible for the camera to take a picture at certain times, but with the Raspberry Pi there will be more control over when the pictures are taken. This should cost $45 after shipping + handling.

2. A power cable to power the Raspberry Pi. I am planning on using an HTC micro USB cable that is here on Amazon that is $4 after shipping + handling.

I ended up going with a Samsung power supply from Amazon because the HTC power supplies did not have good ratings and people said they were not made by HTC. So I am using that Samsung because it had good rating and it is working good.

3. A SD card to use for the Operating System for the Raspberry Pi and to store images from the camera as well. Amazon once again for about $7 after shipping + handling.

4. A camera that is supported by gphoto2 and also by CHDK for taking the photos. The Canon Powershot SX100 or SX110 are the best camera’s that are supported by both gphoto and CHDK. Here is the SX100 listed on Amazon. I got mine for $100 (used – very good condition – had 1500 shots on it when I got it) after shipping + handling. The Canon Powershot A510 should fit in the enclosure and has full support from gphoto2. I bought one from Amazon for $41 after shipping + handling.

5. The third item is a USB cable that connects the camera to the Raspberry Pi. This is also availble on Amazon and mine cost $12 after shipping + handling.

6. An AC power supply is also necessary to power the camera. Once again Amazon seems to be the best. This cost $15 after shipping + handling.

7. A housing for all of these components is a critical point for the survival of the camera in all kinds of weather. An enclosure made for security cameras seemed to be the best option. I originally looking into building myself one using a waterproof container and a bunch of pieces to make it all work. Then I found this enclosure (also Amazon) and it has a heater and a fan to regulate the temperature. And it is IP66 rated. This costs $47 after shipping + handling.

8. A power supply to power the heater/blower in the enclosure is available at Amazon. It is sold by the same supplier as the enclosure and is confirmed to work with this model of enclosure. This cost $36 after shipping + handling.

9. Silica gel is something that comes in packages and I will put several of  these packets in to reduce moisture.

10. A case to hold all of the power cables that plug into the power strip. This needs to be kept dry and it has to be in a separate case because the enclosure that holds the camera and Raspberry Pi is too small to hold all of this as well. This Sockit Box case from Amazon should do the job nicely! It costs $33 dollars which is a little expensive I thought, but it is a very important part of the project.

11. I bought some plastic screws and nuts to hold the Raspberry Pi in the enclosure and keep it from touching the metal sides. This I bought from my local Lowe’s store and it only cost $5 dollars for all of it.

Still need

A power supply for the enclosure. It does not come with one, but requires one for the heater/fan.

A power cord (120V) to be able to run to the enclosure to power all of the electronics.

Conclusion

At this point all of the materials cost $207 and I hope to keep it under $250 with the rest of the materials that are still needed. And no I am not trying to sell Amazon stuff, but they have been consistently the best price for the quality that I need.

Tag Cloud